Introduction to Programming for Public Policy (30550)
Windows Install Instructions
Please complete the cygwin installation before the first class!
Cygwin (Terminal)
- Go to https://cygwin.com/install.html
- Download the 64-bit version (setup-x86_64.exe) and open it.
- Click through the first setup window (Cygwin Setup).
- “Choose Installation Type” → “Install from Internet.”
- “Choose Installation Directory” → whatever you’d like, but the default (C:\cygwin64) is good. If you’re updating an existing installation, be careful to ensure that it is the same location as your current copy!
- “Select Local Package Directory” → again, whatever you’d like, but the Downloads default is good.
- “Select Connection Type” → “Direct Connection”
- “Choose Download Sites” → any are fine.
- “Select packages.” Switch “View” to “Not Installed.” Pay attention here: what you’re doing is selecting the “additional prorams that you’ll want!
- search “sqlite3”. For “sqlite3: Client program for accessing SQLite3 databases”, click on “Skip” that it says 3.20.1-1 (or so), instead of “Skip”.
- search “git”. For “git: Distributed version control system”, click on “Skip” that it says 2.14.0-1 (or so), instead of “Skip”.
- search “python3”. Click on “python3: Py3K language interpreter” to replace “Skip” with (~3.6.1-1).
- search “curl”. Click on “curl: Multi-protocol file transfer tool” to replace “Skip” with (~7.55.1-1).
- search “unzip”. Click on “unzip: Info-Zip decompression utility” to replace “Skip” with (~6.0-17).
- Next.
- If it comes up: “Resolving Dependencies” → Next. (i.e., leave “Select required packages (RECOMMENDED)” checked.)
- The setup will now start “spinning.” Give it some time.
- “Installation Status and Create Icons” → Up to you (“Finish”). I do have the icons.
Bonus: if you need to install additional packages, you can just run the exact same cygwin installer, over and over again, adding the extra packages you want (e.g., curl).
Anaconda
- Go to https://www.continuum.io/downloads. Download and open the 64-bit Python 3.6 installer. (Don’t give them your email!)
- Setup: Next.
- “License Agreement” → Agree to the terms and conditions.
- “Select Installation Type” → Just Me (recommended).
- “Choose Install Location” → Default is probably fine. Make a note of where it goes. In my case:
C:\cygwin64\home\<YOUR_USER_ID>\Continuum\Anaconda3(<YOUR_USER_ID>is actually your user id, not that string.)
- “Advanced Installation Options” → just accept. “Install.” (Let it go.)
- Skip the option to install Microsoft Visual Studio.
- Learn about Anaconda cloud only if you feel like it (no).
- Now, open up cygwin. You will be at /home/<YOUR_USER_ID>/. Type
which python. It will probably not be the one you just installed.- Using Atom, open up the file
.bashrc, which should be in/home/UserName/in your cygwin directory: in my case,C:\cygwin\home\jsaxon\.bashrc. - At the end of this fille, add and save (with an appropriate substitution for the path)
export PATH=/cygdrive/c/the/path/to/your/Continuum/Anaconda4:/cygdrive/c/the/path/to/your/Continuum/Anaconda4/Scripts:$PATH - What is this doing? The
.bashrcfile runs every time you open up a terminal, to initialize your environment. We want to modify that initialization. ThePATHis the list of places, separated by colons, where the computer looks for programs. Your computer may have foundpythonbefore, if there was some copy ofpythonon your machine. But you want it to first find (and therefore use) this new copy from Anaconda, which has these nifty doodads that we’ll use later in the course. By runningexport PATH=..., you are updating yourPATHaccordingly.
- Using Atom, open up the file
- Now, when you open cygwin, you should be able to get a python prompt via
python -i(return) (it should say “Python 3.6.2 | Anaconda 4…”). - Finally, let’s make sure that Jupyter can be started easily.
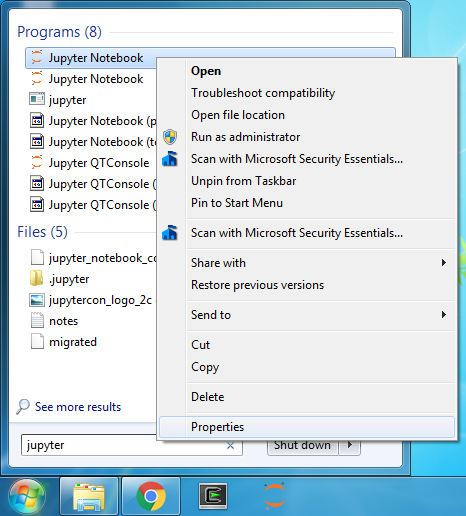
- Search for it in the start menu, then right-click, and select “Properties.” (See pictures, below.)
- If you’re on Windows 10, I think you will need to first click on “Open File Location,” and then again right click to see “Properties.”
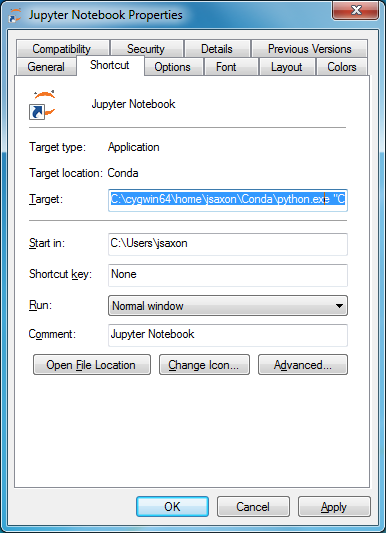
- Change the target field to the following, with appropriate substitutions! By “appropriate substitutions,” I mean that you will replace the final path in this string to where you want juptyer notebooks to launch.
The earlier parts will be different from mine – they are on your computer.
The last bit – the final path – is where you want to the notebook to launch, and it is the only part you will change.
You will not change the earlier paths.
C:\cygwin64\home\jsaxon\Conda\python.exe "C:/cygwin64/home/jsaxon/Conda/Scripts/jupyter-notebook-script.py" --NotebookApp.iopub_data_rate_limit=100000000 C:\WHERE\YOU\WANT\TO\LAUNCHNote that your classmates with Macs will simply launch
jupyter notebook. You should not do this, as it will launch multiple servers that are a pain to kill, and a potential security hole.
- Search for it in the start menu, then right-click, and select “Properties.” (See pictures, below.)
You’re done the python part!
Atom Install
- Go to atom.io and download the Windows installer. Launch it. It is that easy!
- Installing a “de-linter” to find bugs in your code will help a lot. Go to settings (Ctrl+Comma) and click on “Install.” Then search for “linter-pylint” and install it with all of the dependencies that come up. Now whenever you save a python file, it will (partially!!) check your work!
GitHub Account
-
Create a student GitHub account, or just a standard GitHub account. You will use this account to push (submit) all of your work. You have already installed the command line git, through cygwin.
-
Tell GitHub who you are, by executing from the command line (cygwin):
git config --global user.email "you@example.com"
git config --global user.name "Your Name"

